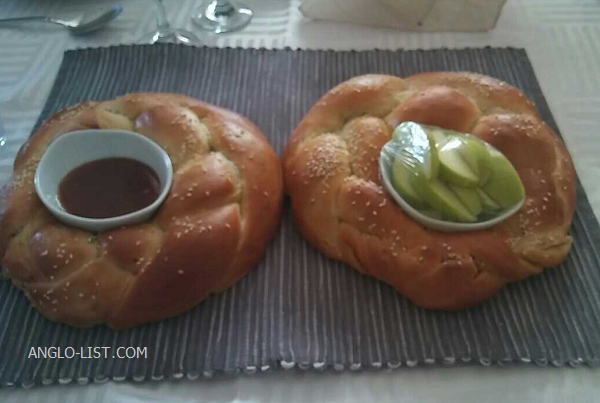
Our favorite Rosh HaShanah Challah recipe for novice and expert bakers.

Even the most confident of cooks are often put off by bread making – working with fresh yeast and waiting hours for the bread to rise is daunting for many. It’s easier to nip down to the local supermarket or neighborhood bakery (Heb: Konditoria) for a special bread. For Shabbat and Rosh Hashanah though, we want something out of the ordinary and a home-made challah is a special treat.
Our basic Challah recipe works perfectly for Shabbat and with a few extra ingredients, it is transformed to the most delightful celebratory loaf for Rosh Hashanah.
Locate English speaking professionals in your area
The Basic Challah Recipe
Ingredients
4 C all purpose flour
1 heaped tbsp of instant dry yeast
4 tbsp white sugar
1 heaped tsp of salt
1.3 C water (330ml)
Preparation
- Combine all the dry ingredients in the bowl of your mixer (remember to attach the dough hook), and on the lowest speed, allow the dough hook to combine the dry ingredients thoroughly. This will only take a minute or two.
- Once the dry ingredients are well mixed, start adding the water slowly, little by little, until it is all mixed through.
- Let the mixer knead the dough for 5 – 10 minutes until the dough is smooth. The dough should not be too sticky and not too dry either.
- Remove the dough hook
- Oil your hand with vegetable oil and rub this over the dough making sure the entire mass is well coated. It should not be dripping in oil.
- Cover the bowl with either cling film or a clean tea-towel and allow the dough to double in size. You must make allowances for rising times in summer and winter. In Israel, during the summer months, it can take as little as an hour for the dough to rise, but in the winter you definately need to allow more time for this.
- Once the dough has risen, remove it from the bowl onto a floured surface.
- After it has risen, once you touch the dough, it will collapse. No need to worry – that’s supposed to happen.
- Knead the dough by hand until all the bubbles (and your frustrations) are removed and dough is soft and workable.
- Divide the dough into two equal sized pieces and work with one piece at a time.
- Divide each of the large piece into three equal sized, smaller pieces
- You can shape each piece into a long sausage, but I get better results by rolling each piece out with a rolling pin. I roll it into a circle about 1/2cm thick and then from one end I roll the dough back up into a sausage shape. Do this with all three pieces of dough until you have 3 evenly shaped ‘sausages’ of equal length.
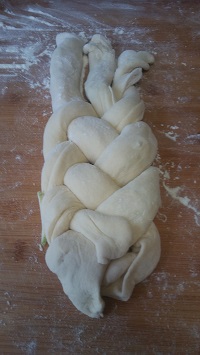
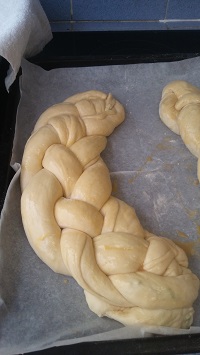
- Plait the the 3 strands of dough and place the challah onto baking paper on a baking sheet. Shape the plait into a circle, but do not join the ends yet.
- Repeat the process with the 2nd mass of dough.
- Allow both dough circles to rise again, for the 2nd time, until the dough has doubled in size.
- Once the dough is fully risen, join both ends of the dough to close each circle.
- You can egg-wash the dough and sprinkle sesame or poppy seeds before you bake.
- Personally, I don’t like the taste of egg-wash, so I dilute a little honey or Silan (date syrup) with water and brush it over the challah. It gives a lovely shine and of course, it’s nice and sweet.
- After 15 – 20 minutes of baking in a moderate oven – 180ºC – you will have a perfectly golden, delicious challah. You can brush more honey or Silan on the challah for a perfect gloss. (This makes the crust a little sticky though)
- Remove the Challahs from the baking tray and place on a cooling rack. This is an important step otherwise the base of the challah will become soggy.
Huge relief! You don’t need a mixer and dough hook for this recipe. All the mixing and kneading can be done by hand.
Hate getting bits of dough under your nails and on your fingers? Wear latex surgical gloves, then tip ’em in the trash and your manicure will still be perfect.
My daughter, who is becoming a real baleboste in the kitchen, adds one beaten egg to the dough. If you do this, reduce the water to 300ml instead.
Teach your children new Rosh Hashanah words, with English and transliterations
Rosh Hashanah simanin and symbols and blessings
Low budget table decorations for the holidays
The Rosh Hashanah Challah
Extra Ingredients
- You will need 1 or 2 peeled and grated apples – Granny Smith are best.
- Sugar for sprinkling
- Dash of cinnamon (optional)
Preparation
Prepare the dough in exactly the same method until step no. 12.
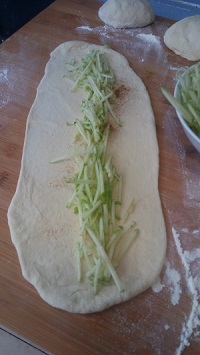
Once you have rolled out one of the 3 pieces of dough into a circle of approximately 1/2cm thick, take the grated apple and sprinkle it evenly on the dough. Sprinkle with a bit of sugar and cinnamon if you like (you can also add nuts of your choice), and then roll the dough back up until you have an apple filled, ‘sausage’.
Continue plaiting the dough as usual from step no. 13. until you have completed all steps and the baking process.
B’tay’avon – Bon appetite!

 |
 |
 |


